
|
|
|

|
|
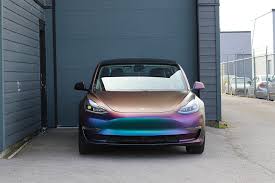
Chameleon Wraps are a fantastic way to transform the look of your vehicle, giving it a unique, eye-catching finish that shifts colors with the light. Whether you're a car enthusiast or a professional detailer, mastering the application of these wraps can elevate your vehicle's aesthetics to a whole new level. Here's a guide to applying chameleon wraps like a pro.
*Understanding Chameleon Wraps
Chameleon wraps are special vinyl films that change color based on the angle of light and view. They are popular for their dynamic appearance and ability to make any vehicle stand out. However, their application requires precision and care to achieve a seamless finish.
*Preparation is Key
1. "Clean the Surface": Before applying the wrap, ensure that the vehicle's surface is thoroughly cleaned. Remove all dust, dirt, and grease using a gentle cleaner. Any residue can cause bubbles or imperfections in the wrap.
2. "Smooth Out Imperfections": Check for dents or scratches and address them before application. A smooth surface is crucial for the wrap to adhere properly and look flawless.
3. "Gather Your Tools": You'll need a squeegee, heat gun, utility knife, and a microfiber cloth. These tools will help you apply the wrap smoothly and make adjustments as needed.
*Application Process
1. "Measure and Cut": Measure the sections of the vehicle you intend to wrap and cut the vinyl accordingly, leaving a little extra material to work with.
2. "Start Small": Begin with smaller sections to get accustomed to the material's flexibility and behavior. This practice will help you manage larger sections with confidence.
3. "Apply Heat": Use a heat gun to warm the vinyl slightly. This makes it more pliable and easier to stretch over curves and contours of the vehicle.
4. "Smooth and Stretch": Starting from the center, use your squeegee to press the wrap onto the surface, working outwards to eliminate air bubbles. Stretch and adjust as necessary, using heat to help the vinyl conform to complex shapes.
5. "Trim Excess Material": Once applied, carefully trim away any excess vinyl using a utility knife. Be precise to avoid cutting into the vehicle's paintwork.
6. "Final Touches": Use the heat gun to go over edges and corners, ensuring they are firmly adhered and won't peel back over time.(Silver Vinyl Wrap)
*Post-Application Care
After application, avoid washing the vehicle for at least 48 hours to allow the adhesive to set fully. Regular maintenance involves gentle washing and avoiding abrasive materials that could scratch or damage the wrap.
Applying chameleon wraps requires patience and precision but offers a rewarding result that can dramatically enhance your vehicle's appearance. By following these steps, you can achieve a professional-grade finish that showcases your car in its best light. For more detailed guides and professional insights, visit www.nascarwraps.com where experts share their tips and tricks for perfect applications every time. Happy wrapping!